A yoga instructor needs yoga website to show his resume and building a brand and marketing. If he have a yoga website, it helps to increase your number of student and it allow you to make deeper relationship with them.
If you want to grow your business and establish as an expert to show people your professionalism, you have to create a yoga website. Want to create a yoga website but dont know how to start it?
I promise, it is not too much difficult as you think. I will guide you how to set your own yoga website with wordpress with following simple few steps.
How to build a yoga website in 10 steps
1. Get your domain name
The domain name is the name which your website will be found in the internet. Imagine your are a instructor and you want to create a website, you should have a name that people can call you and know your business. For example thepantheonmethod.com is the domain name of client’s website that i built. you can check your domain available or not.
If you have confusion to select domain name, i recommend to do some combination with your name – that will stay with career. like your name is Siddha. So now you can make combination with your name to your business. Your name + Business name = siddhayoga.com.
You can buy your domain name together with hosting. next step follow
2. Choose hosting provider
There are a lot of hosting providers, some is good and some is bad. if you dont have knowledge about hosting, you will fall confusion which one should i select? I have used hosting plan from several companies. I help you to find a good hosting plan for you.
So i did research about hosting and i used some hosting from previous provider. I found some positive feedback that is siteground and hostinger. if you want to use, you can go to the website and choose your right package.
After chosing the package, you can enter your domain name that is available or if you have already domain name, you point out to this hosting with changing dns record.
Then process your order and fill the form with personal and payment information and make sure the form and uncheck the extra and proccess. You got domain name and hosting.
3. Install wordpress
After purchasing your hosting plan, your account will be created, and you can access the customer area. SiteGround / Hostinger provides a WordPress Preinstall option, making the setup process easy.
On the next screen, enter your WordPress login details. For security reasons, choose a username that isn’t your name, your website name, or “admin.” This is important for keeping your site secure. Also, pick a strong password with at least 8 characters, including numbers and symbols. Save these details for later.
You will then be asked to select a design template for your WordPress site. You can skip this step for now, as we’ll handle the theme later.
On the next screen, you’ll see your details and your admin URL, which will look something like this: http://yourwebsitename.com/wp-admin. Bookmark this link, and have your login details ready.
4. Select a theme
Before setting up your new WordPress website, you need to choose a theme. A theme controls the overall look of your site, including layout, fonts, and colors. You can either select a free theme from the WordPress theme directory or purchase a premium theme.
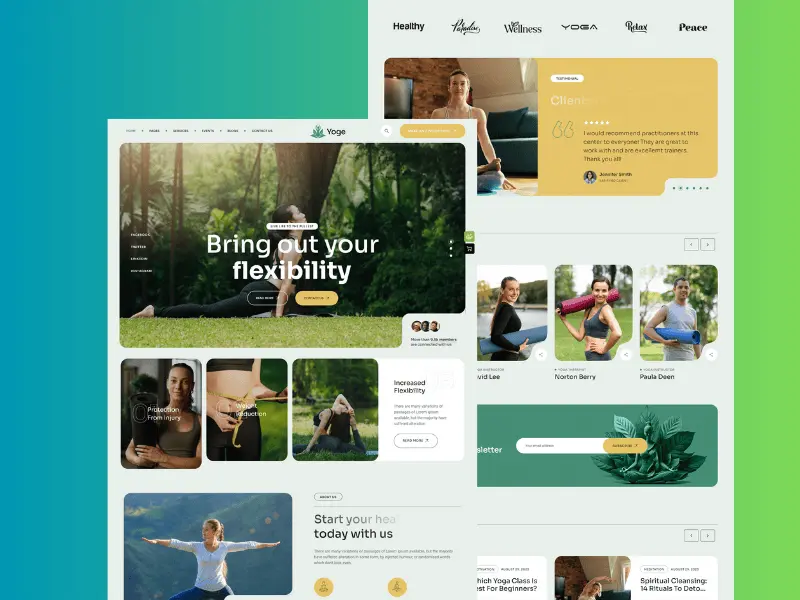
Premium themes often have better coding and come with support in case you encounter issues. You can find great premium themes on websites like ThemeForest or ElegantThemes. For example, I use the Yoga theme from ThemeForest for both this blog and yoga class, theme collection and I love its flexibility and customization options. It costs from $40 to $60, but it’s worth the price for what it offers. Keep in mind that more flexible themes, like Kriya, can take time to learn, so be prepared for a bit of a learning curve. When picking a theme, go for something you like right away to avoid too much customization, especially if it’s your first website!
If you have small budget or you have own design that you like most or want to copy any design from another website, you can hire me.
Once you’ve selected your theme, download the theme files (in a .zip format). Go back to your WordPress admin area, navigate to Appearance > Themes, and click Add New. Then click Upload and upload your theme’s .zip file. After it’s uploaded, go to Appearance > Themes, and click Activate to apply your theme.
5. Creating Content
When you first view your website, you might notice it doesn’t yet resemble the beautiful theme demo. That’s because you haven’t added any content yet!
To get started, take a look at some yoga websites you admire, as well as the demo for your chosen theme. If this is your first WordPress site, it’s a good idea to stick closely to the demo content for guidance. Consider your navigation menu, header image, intro text, and any other content you want to feature. Start gathering testimonials and make sure your social media links are ready to be added.
For a yoga teacher website, I suggest including these pages and sections:
- Homepage: A large header image, an intro section that explains who you are and what you do, content boxes for services, testimonials, and latest blog posts.
- About: More details about you, your background, and your yoga journey, along with some nice yoga photos.
- Classes: Information about your classes, including where and when you teach.
- Workshops/Retreats: If you offer these, create a page to showcase your upcoming events.
- Blog: A space to share your thoughts and insights on yoga-related topics.
- Contact: Include a contact form and other ways people can reach you. Don’t forget to add your location if relevant.
Take your time developing the content for your website. Have someone proofread your text, get high-quality images, and ensure everything is ready for the next step. You can also check out my blog post on great website design principles to learn more.
6. Organise content and image
After creating your content, you have to set everything up in WordPress! Start by adding your logo, header image, intro text, menu, and widgets in the WordPress backend. The exact steps for this will depend on your theme, so check the theme’s documentation and experiment until you’re satisfied with the results.
It can take time and might feel tricky, but don’t get discouraged! Be patient and explore the theme options. With some persistence, you’ll get it done.
Here are some basic WordPress tips to help you:
- Pages: Use pages for permanent content, like your About or Contact pages.
- Posts: Use posts for blog entries, which can be organized by categories and tags. Blog posts show up in date order, and you can create as many as you like.
- Widgets: These are small tools that add features to your sidebar or other parts of your site without needing any coding. You can manage widgets under Appearance » Widgets.
- Menus: Menus control your site’s navigation. Set them up by going to Appearance » Menus. Once your pages are created, you can add them to your navigation menu
7. Install some useful plugins
Installing essential plugins to add extra functionality and performance of your yoga website. Here’s a guide to help you get started with some must-have plugins:
- SEO Plugin: Rank Math or Yoast SEO helps optimize your content for search engines. These plugins offer features like keyword optimization, meta descriptions, and readability checks to improve your site’s visibility.
- Caching Plugin: WP Super Cache or W3 Total Cache speeds up your website by caching static versions of your pages. This reduces load times and improves user experience.
- Security Plugin: Wordfence Security or Sucuri Security provides protection against threats and vulnerabilities. They offer firewall protection, malware scanning, and security monitoring to keep your site safe.
- Backup Plugin: UpdraftPlus or BackupBuddy ensures that your site’s data is backed up regularly. In case of issues, you can restore your website to a previous state quickly and easily.
- Contact Form Plugin: WPForms or Contact Form 7 allows visitors to easily reach out to you. Customize forms for inquiries, booking classes, or receiving feedback.
- Social Media Plugin: Social Snap or Simple Social Icons helps integrate social media sharing buttons on your site, making it easy for visitors to share your content and follow your profiles.
- Booking Plugin: Bookly or Amelia is ideal for managing class schedules and appointments. These plugins allow clients to book yoga sessions online and help you manage your schedule efficiently.
- Gallery Plugin: Envira Gallery or NextGEN Gallery helps you create and manage photo galleries. Showcase your yoga classes, events, and studio images to attract more visitors.
To install these plugins, go to your WordPress dashboard, navigate to Plugins > Add New, search for the plugin by name, and click Install Now followed by Activate. Once installed, configure each plugin according to your needs to enhance your website’s functionality.
8. Connect website with Google Analytics
The google analytics helps to understand how your audience interacts with your website. It is a good and it is free.
Connecting your website with Google Analytics is essential for tracking and analyzing your site’s performance. Here’s how to set it up:
- Create a Google Analytics Account: Go to Google Analytics and sign in with your Google account. Click Start for free to create a new account. Follow the prompts to set up your account and property (your website).
- Get Your Tracking Code: After setting up your property, you’ll receive a unique tracking code. Copy this code, as you’ll need it for the next step.
- Install a Google Analytics Plugin: In your WordPress dashboard, go to Plugins > Add New. Search for a plugin like MonsterInsights or Site Kit by Google. These plugins simplify the process of connecting Google Analytics to your website. Click Install Now and then Activate.
- Connect the Plugin to Google Analytics: Once the plugin is activated, go to its settings page (usually found under Insights or Site Kit). Follow the instructions to authenticate and connect your Google Analytics account.
- Verify Tracking: After connecting, check your Google Analytics account to ensure that data is being collected. It may take a few hours for data to appear.
By connecting your site to Google Analytics, you’ll gain valuable insights into your visitors’ behavior, traffic sources, and more, helping you make informed decisions to improve your yoga website.
9. Set up Newsletter
If you want to collect email address of your audience. I recomend you to use mailchimp free version as a newsletter.
Go to Mailchimp and sign up for a free account if you don’t already have one. Follow the prompts to enter your details and set up your account.
Once logged in, go to the Audience tab. Click Create Audience and follow the setup wizard to create a new audience (this is your list of subscribers). Fill in the required details, like audience name and email address, and set your preferences for notifications.
You can use a Mailchimp plugin for easier integration. Go to Plugins > Add New in WordPress, search for Mailchimp, and install a plugin like Mailchimp for WooCommerce or Mailchimp Forms by MailMunch. Activate the plugin and follow its setup instructions to connect your Mailchimp account and manage forms directly from WordPress.
10. Publish your website
To finalize your website and get it ready for launch, follow these steps:
- Review Content: Double-check all your content for accuracy and clarity. Ensure that text is free of spelling and grammar errors, and that images are high-quality and correctly placed.
- Check Mobile Responsiveness: Make sure your website looks and functions well on various devices and screen sizes. Test your site on mobile phones, tablets, and desktop computers to ensure a smooth user experience.
- Test Functionality: Verify that all forms, buttons, and interactive elements work as expected. Ensure that contact forms, booking forms, and any other features are functioning correctly.
- Optimize for SEO: Use your SEO plugin to optimize your site’s meta descriptions, titles, and keywords. Check that each page has appropriate headings and that images have alt text.
- Set Up Analytics: Confirm that Google Analytics is correctly tracking your website’s performance. Check that data is being recorded and that you can view relevant metrics.
- Install Security Measures: Ensure that your security plugin is active and configured properly. Set up backups and confirm that they are running regularly.
- testing the site: Navigate through your site as if you were a visitor to ensure everything is working smoothly.
By following these steps, you’ll ensure that your website is polished, functional, and ready for your audience.